


Introduction
This document describes the installation process for Floe releases prior to version 200.
For installation instructions covering newer versions of Floe please see the Floe Installation Guide.
System Requirements
Arch Floe is installed as an ABAP Add-On into a SAP WebAS ABAP Stack.
A SAP NetWeaver 7.0 Application Server (or above) is required. The following software components are required:
- SAP_ABA
- SAP_BASIS
1. Performing the Installation of Floe
1.1 SAINT
Log on to your SAP system as client 000 and as a user that has SAP_ALL authorization. Do not use the user SAP* or DDIC.
For installations or upgrades use Add-On Installation Tool (transaction SAINT).
For more information about this, see the online documentation for Add-On Installation Tool. To do this, choose the help function on the toolbar.
Load the software package:
- SAINT -> Installation Package -> Load Packages -> From Front End
1.2 SGEN
At this point you should compile Floe using the SGEN transaction.
- Transaction SGEN.
- Select the first option: Generate All Objects of Selected .... - Continue
- Select for Parallel Generation: Leave default. - Continue
- Start Job Directly.
2 Post-Installation Configuration
2.1 ZFLOE Packages
Two packages are important for the configuration of the Floe system:
2.1.1 ZFLOE_CUST
This package is used to hold and transport the business logic associated with customer e-mails.
After the initial installation, this package should be repaired in transaction SE21 to change the transport layer to the customer’s standard transport layer, such that objects in this package can be successfully migrated through the customer landscape.
- Transaction SE21.
- Package will be ZFLOE_CUST and select Create.
- Short Description: FLOE: Customer Logic
- Application Component: CA
- Software Component: HOME
- Transport Layer: Customer Specific, Default SAP.
- Save
2.1.2 ZFLOE_AUTHORIZATIONS
This package is used to hold objects that cannot be maintained in the /FLOE/ namespace, eg authorization objects, such that they can be migrated through the customer’s landscape. The package is created in transaction SE21.
- Transaction SE21.
- Package will be ZFLOE_AUTHORIZATIONS and select Create.
- Short Description: FLOE: Authorization Objects
- Application Component: CA
- Software Component: HOME
- Transport Layer: Customer Specific, Default SAP.
- Save
2.2 Content Management
Floe uses the 'Content Management System' [CMS] or 'Content Server' to optionally store sent e-mails and attachments. The setup of CMS is SAP standard and described fully in the IMG documentation accordingly.
This activity is required if any e-mails / attachments are to be saved after sending. Otherwise it can be omitted.
2.2.1 Content Management Table
The standard Floe installation scenario makes use of SAP DDIC physical tables as the final repository for CMS data, and under those circumstances it is necessary to create a physical table for that purpose.
- Transaction SE11.
- Select the radiobutton 'Tables' and enter table SDOKCONT1. (Those are OHs)
- Copy this table to ZFLOE_CMSCONT1, assigning package ZFLOE_CUST and workbench request as required.
- Activate this table.
Ensure that the technical settings of the table match the expected size of the table, and adjust accordingly.
Floe supports only the SAP Database CMS repository type.
2.2.2 Content Repository
In this Activity, you can define content repository. Floe only supports using the 'SAP System Database' type of repository.
You can find further information on content repositories in the SAP Knowledge Warehouse Installation Guide and in the SAP Library under Basis - Basis Services - SAP Knowledge Provider - Content Management Service - Concepts.
Floe Content Repository:
- Transaction OAC0 (OH-A-C-Zero).
- Change - Create
- Content Rep. : We suggest “ZFLOE001”
- Description: Floe: Email Content Repository
- Document Area: FLOE E-mail Content
- Storage type: SAP System Database
- Version No.: 0046
- Contents Table: ZFLOE_CMSCONT1 (table created in step 2.2.1)
- Save
2.2.3 Content Category
In this activity you assign the storage category to a content repositories (in the Knowledge Provider these are also called content categories).
Follow the steps below to create a new storage category and assign it to the content repository.
Floe Content Category:
- Transaction OACT (OH-A-C-T).
- New Entries
- Category: We suggest “ZFLOE001”
- Description: Floe: Content Category
- Document Area: "/Floe/"
- Content Repo: ZFLOE001 (repository created in step 2.2.2)
- Save
2.3 Email Number Range Interval
The Floe Email ID (/FLOE/EID) Number Range Object is delivered with Floe and a new interval range must be setup in it.
- Transaction SNRO [es-en-ar-oh].
- Enter number range object name (/FLOE/EID).
- Press Number Range button.
- Press change Intervals.
- Create an Interval Range '01'. E.g 01 100000000 – 1999999999 - 1000000000
- Press save.
2.3 Create Class for Variable Routines
Business logic is stored in generated variable routines which are created in class ZFLOE_VARIABLE_ROUTINES. This class must be manually created.
- Transaction SE24.
- Enter Object type: ZFLOE_VARIABLE_ROUTINES
- Press Create button
- Select Object type 'Class' and return.
- Add description 'Floe Variable Routines' and return (Save).
- Assign package ZFLOE_CUST and Save.
- Assign workbench request and return.
- Select 'Activate' pushbutton and return through the pop-up screen.
- Exit.
2.4 SMTP outbound settings
Ensure that SAPconnect is configured to send outbound e-mails through transaction SCOT.
Refer to standard SAP documentation if there is no SMTP node defined under the 'INT'

3 User Management
In SAP, each user’s authorization can be defined with reference to a composite role, single roles, and profiles. The object to be checked is an ‘authorization object’, and is made up of authorization fields that the system will need to use in the check.
Floe is delivered with authorization checking code and the authorization fields, but the set-up of the users, roles, profiles and objects will be different in each implementation.
3.1 Authorization Object
Two authorization fields are delivered as part of Floe:
/FLOE/ECAT Email Category
/FLOE/ETYP Email Type
These two authorization fields, along with the standard field ACTVT, must be included in the authorization object.
Floe is not shipped with an authorization object. Part of the installation process involves the creation of authorization object ‘z/floe/001’.
Creating an Authorization Object
- Transaction SU21 or menu path ‘Tools->ABAP Workbench->Development->Other tools->Authorization objects->Objects’
- Choose the pushbutton for create authorization object.
-
Enter the following:
- Object: ‘z/floe/001’
- Text: ‘Floe: Email Authorization Object'
- Class: ‘AAAB’
- Field name: /FLOE/ECAT
- Field name: /FLOE/ETYP
- Field name: ACTVT
- Select pushbutton to maintain the permitted activities. Use ZFLOE_AUTHORIZATIONS for the package.
- Select options ‘01’ and ‘03’. Save,
- Select pushbutton to create documentation, then save
- Save the authorization object. You may get a message indicating it has already been saved, if so just cancel out of the maintenance window.
- Finally we need to regenerate the SAP_ALL profile in order to include the new object. Use the pushbutton ‘Re-generate SAP_ALL’ on the top of the front screen for transaction RSU21_NEW.
3.2 Roles
There are various ways of linking the authorization object to user ids using roles and profiles. In this section we describe one method, using a ‘single role’ and a ‘generated profile’.
3.2.1 Floe Developer Role
- Transaction code PFCG or select the menu path ‘Tools->Administration->User Maintenance->Role Administration->Roles.’
- Enter role name ‘ZFLOE_DEVELOPER’ and choose the ‘Single Role’ pushbutton.
- Enter the role description then Save
- Select the Authorizations tab
- In the ‘Information About Authorization Profile’ box, select the ‘Propose Profile Names’ pushbutton, and a profile name is generated automatically. Save.
- Select the Change Authorization Data pushbutton. A pop-up window is displayed. Select the ‘Do not select templates’ pushbutton.
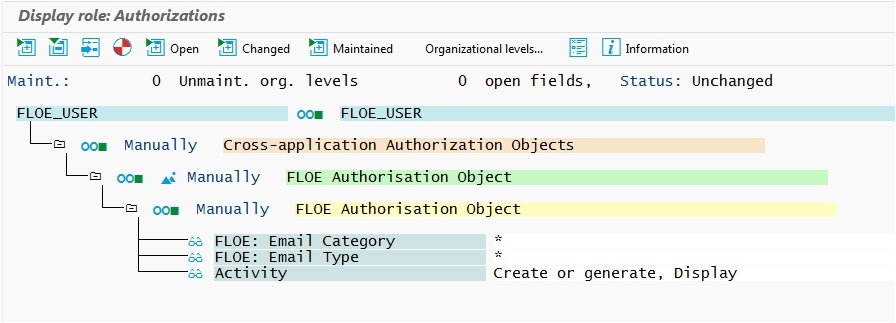
- Now select the ‘Manually’ pushbutton, and enter the authorization object ‘z/floe/001’.
- Expand the hierarchy and then enter values for each field: select the ‘*’ symbol in order for this role to include all form types, categories and activities.
- Select the Manually’ pushbutton again, and enter the authorization object S_TCODE
- Expand the Tree out and select the Change Transaction code button.
- Enter ‘/FLOE/*’ into the ‘Form’ field as shown. This is granting authority for ALL /FLOE transactions to the ZFLOE_DEVELOPER role.
- Generate. (Save)
Role ZFLOE_DEVELOPER is now ready to be linked to existing developer users, who will also require transactions SE24, SLG1, ST22, SE10, SE16, SE91, SO10, SM30, SM34, SPRO, SOST, SCOT
3.2.2 Floe User Role
Follow the same steps as for setting up the ZFLOE_DEVELOPER role, but in the final step, limit the role by email category, e-mail type and /or /FLOE transaction code.
For example, if stored e-mails contain sensitive information, then limit access using the e-mail type and activity '03'.
Activity 01 is required to trigger a new e-mail, so this must be added to profiles for any dialogue or background users who use transactions or programs to trigger Floe e-mails.
3.3 Assign Authorization Groups to /FLOE/ tables for customizing access
Optionally, the delivered Floe tables can be assigned to an authorization group in transaction SE54 to control access.
However, most Floe configuration tables will only be maintained in a Development system, so in general this step will not be required.
The following tables should be maintained in the development system only:
- System settings: /FLOE/SETTINGS
- Variables: /FLOE/VARS & /FLOE/VARST
-
Email Categories: /FLOE/ECAT & /FLOE/ECATT
-
HTML Blocks: /FLOE/HBLOCK & /FLOE/HBLOCKT & /FLOE/HBLOCKC
-
Email Types: /FLOE/ETYPE & /FLOE/ETYPET & /FLOE/ETYPET
The Safe Recipients Table should be maintainable in any non-productive system, as entries are local to that system:
- Safe Recipients: /FLOE/SAFE_REC
The Recipients List Tables should be maintainable in any system:
- Recipients Lists: /FLOE/RLIST & /FLOE/RLISTT & /FLOE/RLISTC
In order to maintain the Recipients Lists, these tables can be added to an existing Authorization Group to enable business users to maintain those tables.
4 Floe System Settings
The final set-up step is to set the Floe System Settings.
In the SAP IMG (transaction SPRO), navigate to the Floe customizing menu
SAP Customizing Implementation Guide -> Cross-Application Components -> General Application Functions -> Floe -> Administration -> System Settings
Floe Settings
5 Floe Notes
Any code corrections are provided via Floe Notes which must be applied manually.
Please review the Floe Notes page and apply any that might be outstanding.