


Post-Installation Configuration should be done on the Client that will be using STB so the objects created below transport properly across the landscape and Customer Systems. We suggest creating a new transport when prompted named “STB <VER> Configuration <CLNT>”.
Gateway Alias assignment
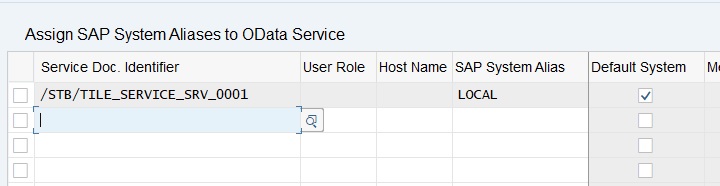
Create entries in table /IWFND/V_MGDEAM (via transaction SM30) for the following services:
-
Service Identifier: /STB/TILE_SERVICE_SRV_0001
- System Alias: LOCAL
- Default System: Checked
*Note* Please make sure Gateway alias is configured. If not refer to troubleshooting guide below.
SICF Node Activations
Activate all STB nodes and subnodes.
- Transaction SICF.
- Enter *stb* into Service Name field
- Press Execute
- Right-click and select Activate all STB
- Choose to Activate this node and all child nodes
Stelo tile builder application
- Service path: /sap/bc/ui5_ui5/stb/
- Service path: /sap/bc/bsp/stb/
- Activate /stb/ and all subnodes
Stelo tile builder GW service - (to be carried out in every system in the landscape)
- Service path: /sap/opu/odata/stb
- Activate /stb/ and all subnodes
STB Tile configuration
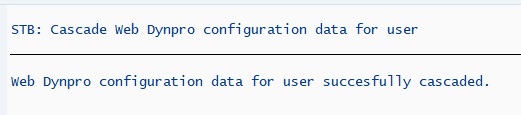
Run program /STB/CASCADE_CONFIG (transaction SE38) to include Stelo tile builder plugin in Fiori launchpad designer.
STB Dataservice package and Function group creation
The ZSTB_CUST package is used to hold and transport the data services and business logic.
Create package ZSTB_CUST
- Transaction SE21.
- Package will be ZSTB_CUST and select Create.
- Short Description: STB Customizing Z Package
- Application Component: CA
- Software Component: HOME
- Transport Layer: Customer Specific, Default SAP.
- Save
STB Function group creation
Create function group ZSTB_DATAS_FMS to hold your custom data service functions for building dynamic tiles.
- Transaction SE37.
- Under More -> Goto -> Function Groups -> Create Group
- Function Group: ZSTB_DATAS_FMS
- Short text: STB Data Services
- Assign to Package above.
To Activate
- Transaction SE80
- Select Function Group from the drop down.
- Enter Group Name: ZSTB_DATAS_FMS
- When the object is displayed right click and Activate.
- Exit
STB Installation Check
Log into Fiori launchpad designer and check if ‘Stelo tile builder 2.0’ tile is visible using ‘Add tile’ option. If Stelo tile builder 2.0 is visible then post installation configuration is successfully complete.
- https://<server>:<port>/sap/bc/ui5_ui5/sap/arsrvc_upb_admn/main.html
Transport
Transport all the changes made and new objects created in the above steps (including table entries) throughout your landscape.
Trouble shooting Guide
In QA and PRD envornments:
- Check all transports have been imported.
- Check SICF nodes are active.
Check SAP System Alias configuration
Manage SAP System Alias and make sure the SAP System Alias is assigned to LOCAL in DEV and transport using a customizing request.

- In NW 7.0-731 go the IMG in transaction SPRO, and open SAP NetWeaver->Gateway->OData Channel->Configuration->Connection Settings->SAP Gateway to SAP System->Manage SAP System Aliases
-
In NW 740+ go to the IMG in transaction SPRO and open SAP Netweaver->SAP Gateway->OData Channel->Configuration->Connection Settings->SAP Gateway to SAP System->Manage SAP System Aliases
- This step must be repeated in every system in your landscape.
- See blog: How to Maintain SAP System Alias Entries in Productive Systems?
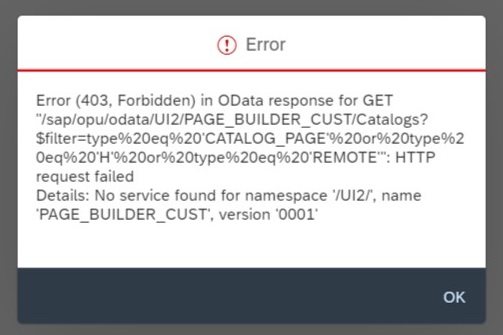
Fiori launchpad designer has error popups
If gateway services are not active then the following popup will appear when user logs into Fiori launchpad designer.
Follow initial setup of launchpad designer as explained in the configuration guide.
Make sure all the required gateway services are activated as explained in the guide.
- Go to transaction /n/IWFND/MAINT_SERVICE
- Click “Add Service”
- Select “LOCAL” system alias
- Click on “Get Services”
-
Select the following services
- /UI2/PAGE_BUILDER_CONF -This is used by the launchpad designer.
- /UI2/PAGE_BUILDER_CUST - This is used by the launchpad designer.
- /UI2/PAGE_BUILDER_PERS - This is used by the launchpad.
- /UI2/LAUNCHPAD - This is used by the launchpad.
- /UI2/TRANSPORT- This is used by the launchpad designer.
- /UI2/INTEROP - This is used by the launchpad and launchpad designer.
- Create a “Z” package and assign to workbench request
- Assign the selected services to the Z package
- There will be a series of workbench assignment prompts. Select the relevant workbench request and start assigning the customised objects to the TR.
- Once the service gets successfully created/added – the following prompt will be displayed.
- Log into launchpad designer and if you notice catalogs/groups are loaded properly, the configuration steps carried out above is successful.